Before and After: A Cheerful Kitchen Remodel in Portland, Oregon

There’s something so satisfying about a classic before and after. Here at Schoolhouse, our coworker recently renovated her kitchen (see the full home tour from a few months back), and we couldn’t be more inspired by the transformation. By working smart and making a few key updates, Katie worked with their existing layout to carve out a cheerful space filled with light and color. Step right this way for some fresh kitchen ideas and the inside scoop on the laborious but oh-so rewarding end result.

What inspired the remodel?
A common theme of 2020 was increased motivation to renovate our homes that we were all spending so much more time in. I, too, fell into that camp. I have been counting the days to say farewell to the chocolate countertops, dated mosaic backsplash, and worn faux wood cabinets. This year gave me the motivation to put my plans in motion.
Before:

After:


At this point, I had been sketching out kitchen layouts for months, maybe years, to find the perfect floor plan. Throughout the process, I searched for the balance between function, form, and marital bliss. My wife is the main cook in the house, so it was important that her preferences were met. We both wanted a bright, open space with function at the forefront. For Alice, durability, flow, ease of maintenance, and light were at the top of the list. My goals were a light-filled space with color, texture, and streamlined surfaces to calm the eye.
How long did it take to renovate?
From demo day to celebrating the last visit from our contractor, it took 7-weeks. There wasn’t constant work during this time. Coordinating all the steps and lead times associated is what made the timeline add up.
Before:

After:


Could you walk us through some updates?
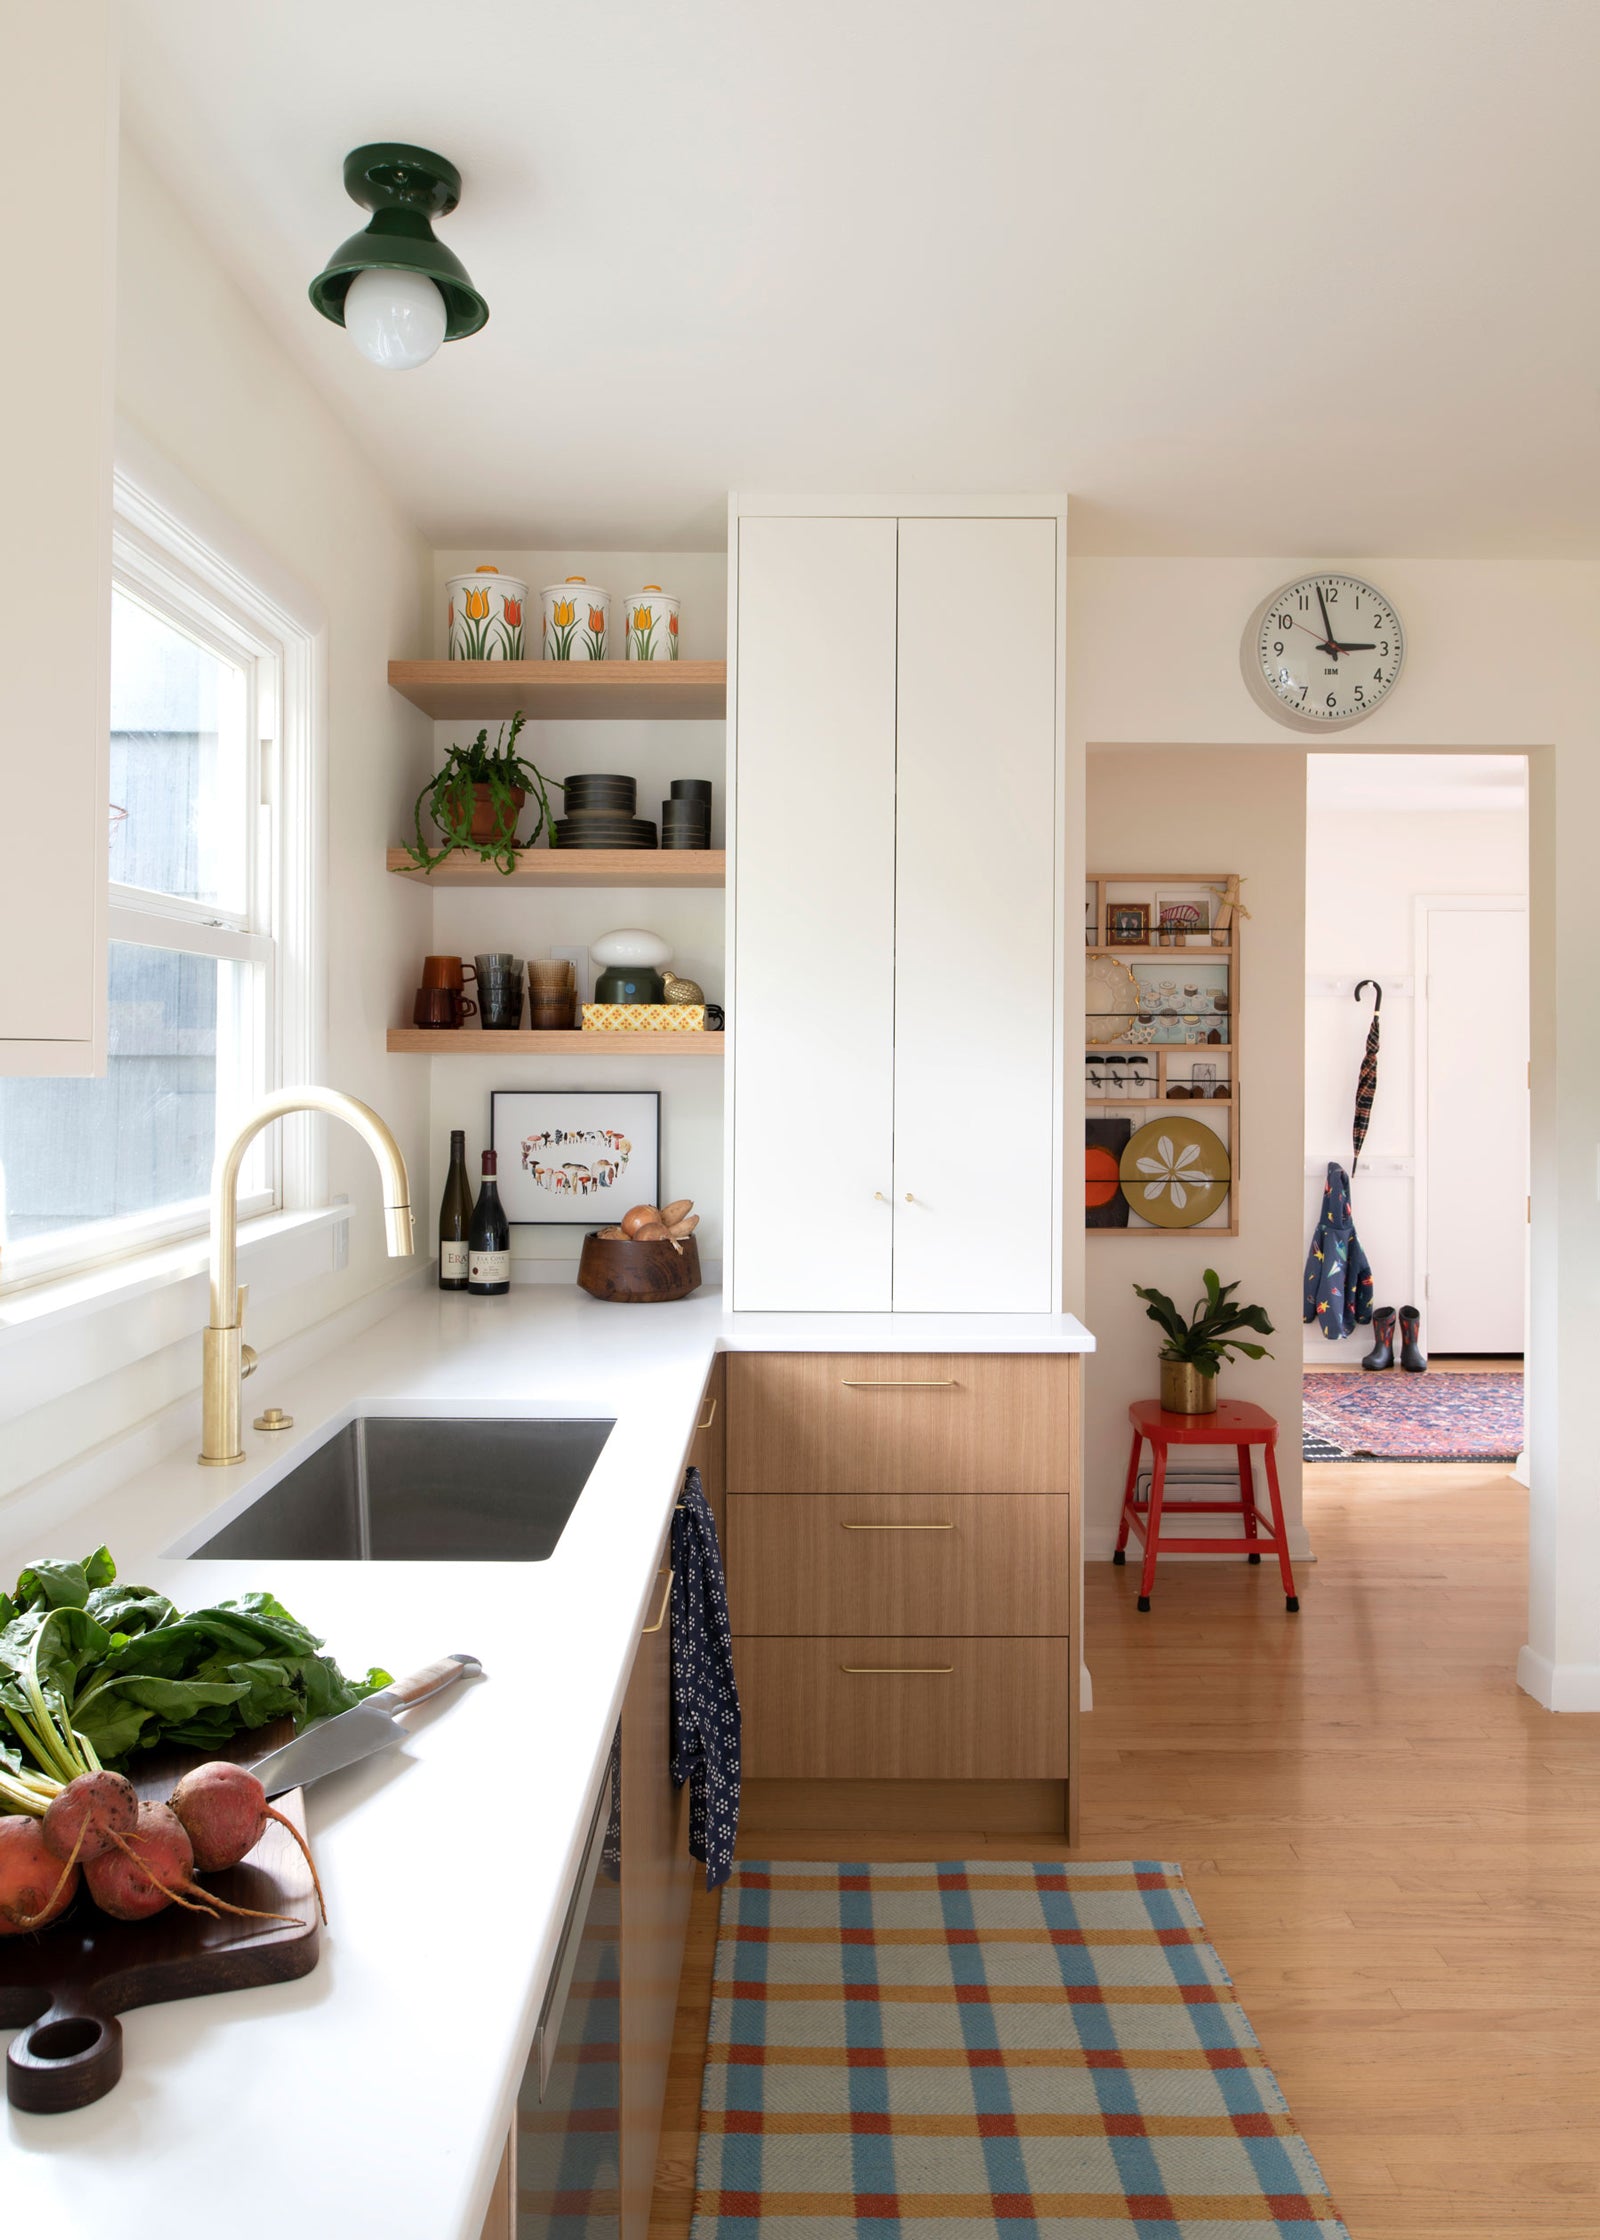
We wanted to maximize our countertop space, increase storage, and create a calm, sleek overview. I explored dozens of layouts with extreme and minute changes. The footprint always stayed the same. To meet our kitchen goals, I removed a tall cabinet (that served as our pantry) from our breakfast nook. The pantry then moved to the other side of the room in a cabinet that houses all our food and hides away our microwave. I also extended the base cabinets to meet the banquette to add a visually clean, horizontal flow.


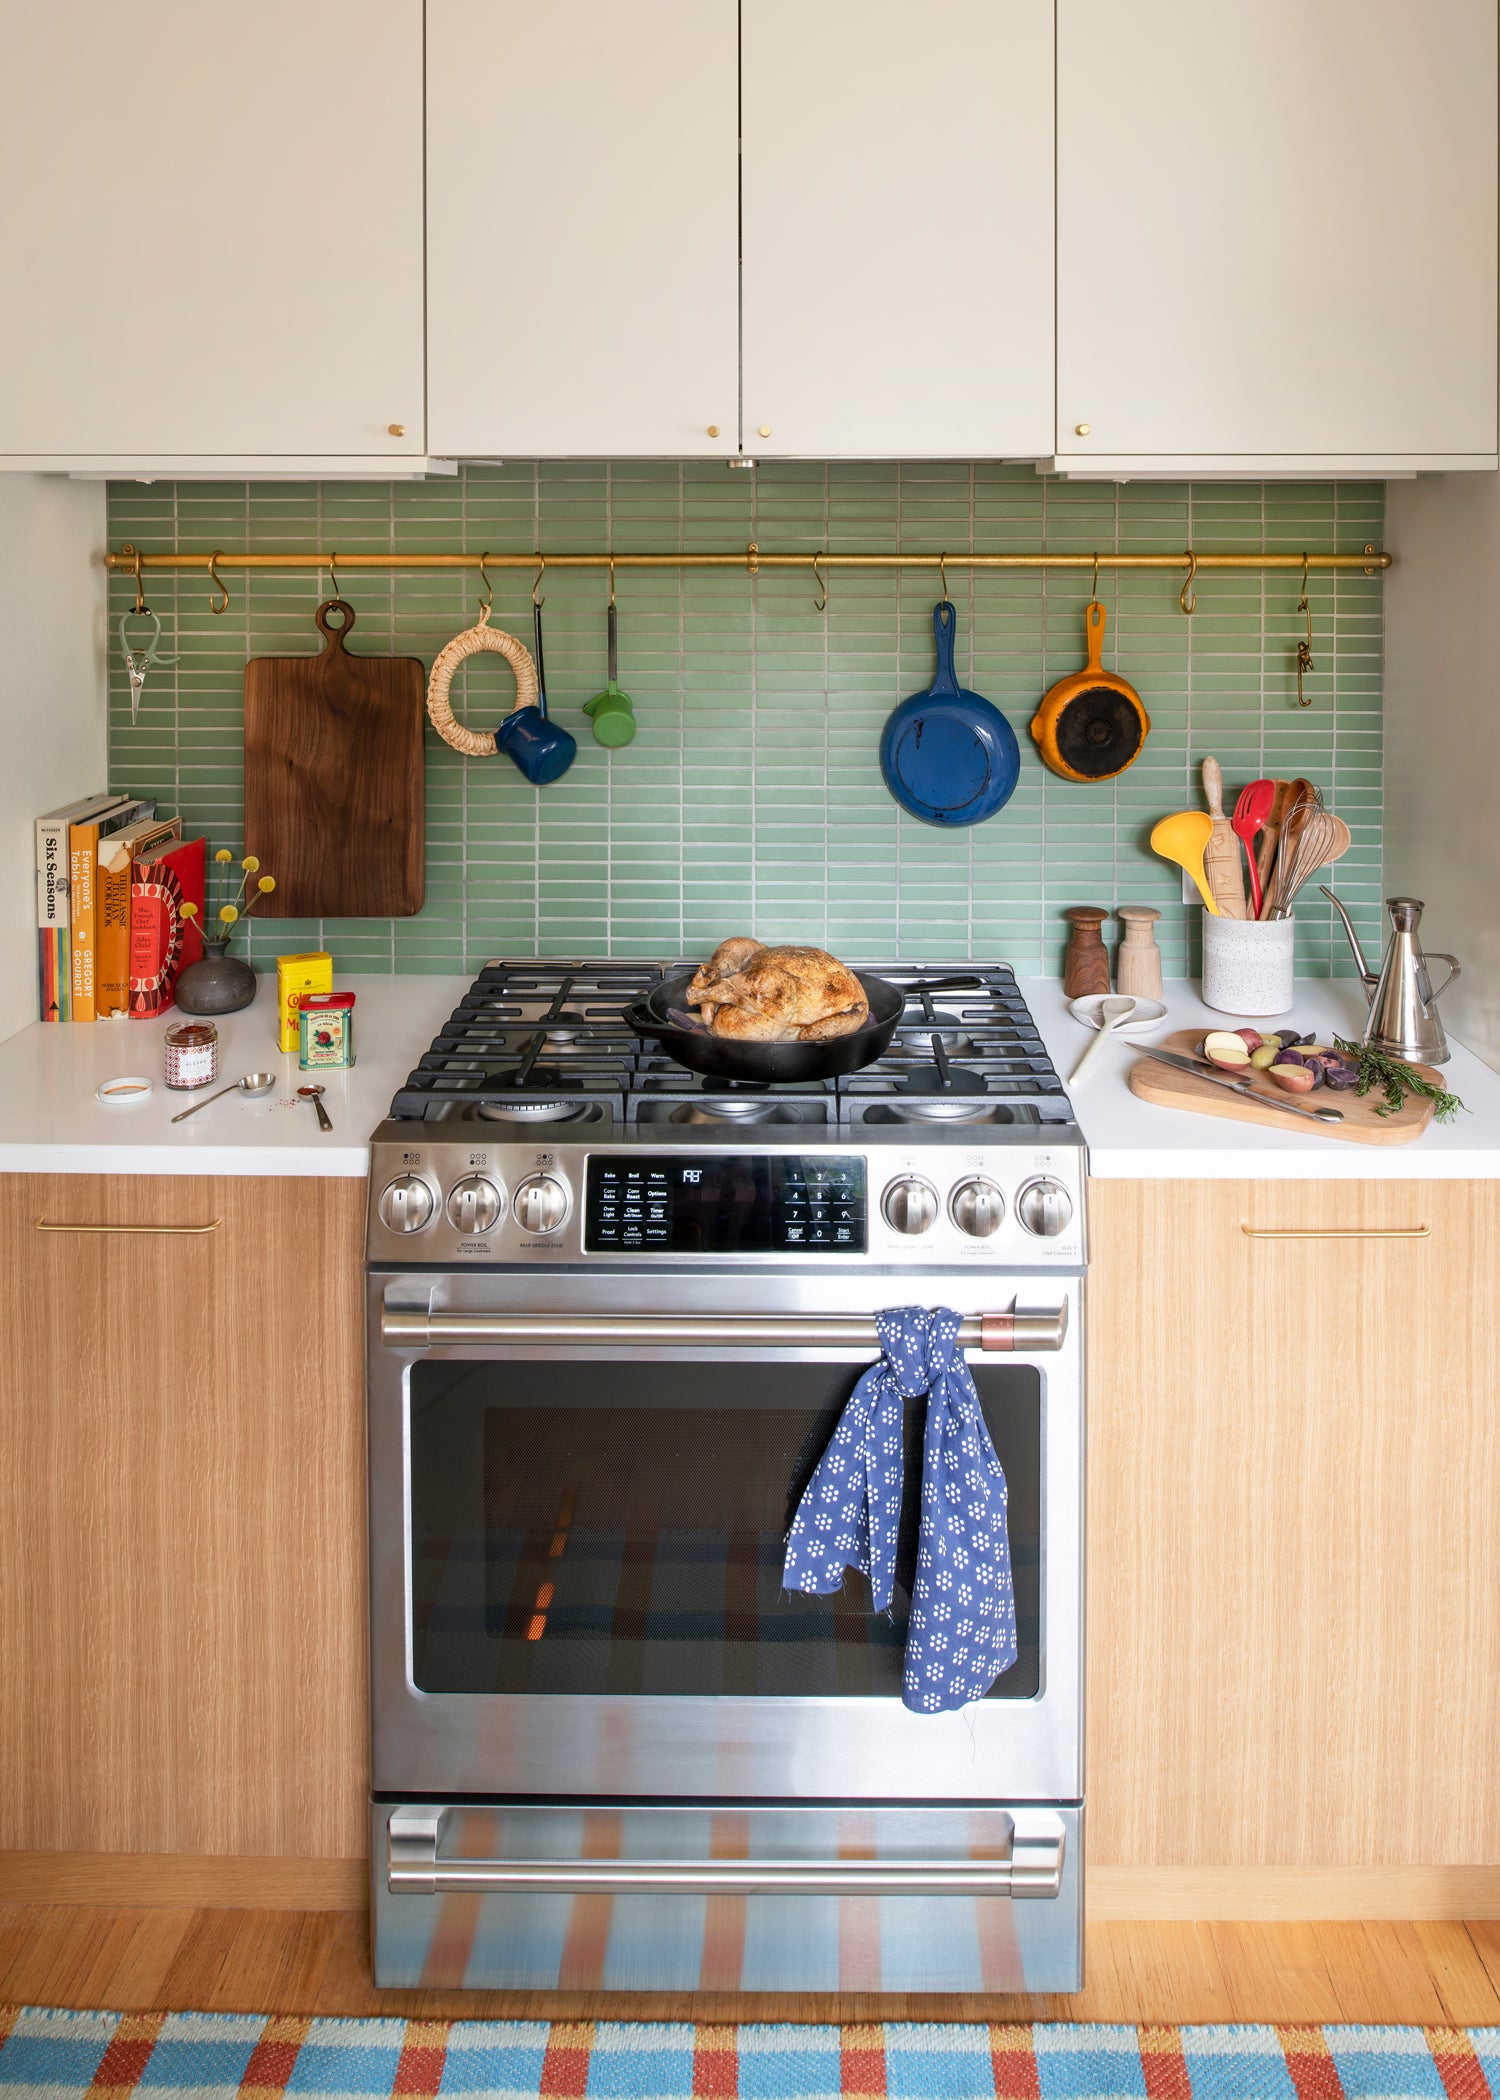
I wanted the overall impression of the room to be bright and colorful. The two-tone cabinets add warmth, while the oak lowers add the perfect natural texture. Kokeena was a great fit because they offer door fronts to fit IKEA cabinets, and their real wood veneer options are unique on the market and authentic in materiality. I chose IKEA for the cabinets because of their affordability, flexibility, and easy customization of design. The upper cabinets are hung a little higher than standard, especially on the range side, to help reinforce the bright open space.
Before:

After:


Tell us more about your picks. How did you go about selecting the materials and colors?
I started with the cabinet finishes of oak and white. I love the warmth and texture of the linear wood grain and how the white cabinets recede into the wall color. This two-tone look is common in mid-century homes, which I drew inspiration from. I chose a minimal, handmade tile from Fireclay behind the range to add color and texture. The variation in grain and the repetition of the grout adds a perfect calm focal point.

Brass details are present throughout the design with the mid-century-inspired Parker Pulls and Radcliffe Knobs. I also used a brass faucet and brass pot rail to keep these elements consistent around the room. As I love mixing finishes, I wasn’t afraid to use stainless steel appliances with brass hardware. My goal was to pick beautiful finishes with depth for the main features (cabinets, tile, counter) and add color and whimsy with accessories like the rug, upholstery, cushions, and art.

Any tips to share for those attempting their own renovation?
Tip #1: Plan meals ahead of time. We lived at home during the remodel, which wasn’t that bad. Alice nailed the food prep by making bulk portions of about seven frozen meals to last us 7-weeks, so that we could reheat them in our makeshift kitchen (our dining room with an induction cooktop).
Tip #2: Find good tradespeople and designers that you trust. It is well worth the money. In addition to designing the space, I served as the general contractor by scheduling and managing the timeline. While this kept us on budget, this was a big job, and I recommend not doing it if you can!
Tip #3: It can be very stressful. Be kind to each other. Your family, your contractors, yourself. I am so lucky to have the resources to create this beautiful kitchen. Sometimes I had to take a deep breath and remember there is always a solution.


Last but not least, what’s your favorite part of the new design?
Katie: This might sound bias, but the lighting is my favorite part. The fixtures are beautiful in form, but they also provide flexibility of mood in the room. The vibe of the kitchen is so much better. It finally feels like home. It is cheerful, light-filled, and so functional!
And because I can't pick just one: I also love how we incorporated some sentimental treasures. My grandmother’s ceramic floral canisters are on the open shelving, and Alice’s late mother’s enameled cast iron pans are hanging behind the stove. These objects remind me of the people who once owned them and make the space feel that much more welcoming.
Alice: My favorite thing about it is how much lighter and brighter it is. As someone who loves to cook, I love to work in a bright space. I also love the sink, more than I even thought I would. The Tupperware drawers are also a thing of beauty.


Source List:
Cabinets, countertop, hood: IKEA
Cabinet Fronts: Kokeena
Tile: Fireclay Clover
Banquette: custom with Knoll Utopia Windmill
Paint color: Benjamin Moore Simply White
Faucet: California Faucets
Fridge: Beko
Sink: Elkay
Brass rail & hooks: deVOL Kitchens
Under cabinet lights: WAC Lighting
Dining table: vintage


